Salesforce App Exchange Install Continue is Greyed Out
Learning Objectives
After completing this unit, you'll be able to:
- Find free reports and dashboards packages on AppExchange.
- Install a reports and dashboards package from AppExchange.
- Modify the reports and dashboards in the installed package.
Install an App from AppExchange
When you're building a report or dashboard, a common strategy is to clone an existing report and modify it to meet your needs. But where do you get sample reports and dashboards to modify? Maria, the admin over at Ursa Major Solar, looks no further than AppExchange!
On AppExchange, there are sample report and dashboard packages available from Salesforce Labs. These can be downloaded and installed into your sandbox or production environment. The packages are free and the reports and dashboards can all be cloned and modified to suit your specific needs.
Popular topics include:
- Salesforce Adoption Dashboards
- Salesforce CRM Dashboards
- Sales Activity Dashboards
- Clean Your Room! Dashboard
- Service & Support Dashboards
- Knowledge Base Dashboards and Reports
- Chatter Dashboards 1.0
- Chatter Challenge Dashboard Pack
Whether you're looking for Sales, Service, Activity, CRM, or adoption-related dashboards, there are sample reports and dashboards available for you.
Keep in mind that some apps contain tabs, fields, objects, and more. And there are governors and limits in Salesforce, which your org is subject to. Apps can either be managed or unmanaged, and your overall limits are affected in different ways depending on which type you choose. When you're installing any app, keep your limits in mind. You can learn more about this topic by viewing the AppExchange Installation Guide.
To install an app, log in to AppExchange, find the app you want, and click Get it Now. During the installation process, you'll need to make a few decisions. Some of the key ones are:
- Where should I install, production or sandbox?
- In general, an AppExchange best practice is to install first in a sandbox. With reports and dashboards, here are a few considerations:
- Some of the packages come bundled with a handful of custom fields.
- Reports, dashboards, folders, and custom fields all have names, which may conflict with existing names in your org.
- Packages all come with report and/or dashboard folders.
- Now that you know what specifically you're installing, you can decide where you want to install it.
 You can preview all of the components in the package during the installation process.
- In general, an AppExchange best practice is to install first in a sandbox. With reports and dashboards, here are a few considerations:
- Do you want to give permissions to admins only, all users, or specific profiles?
- Who should have access to these reports, dashboards, folders, and in some cases, custom fields? This is an area where you may want to do a bit of pre-planning before you install, so you don't have to make updates to profiles and folder sharing settings after you install.
Once your installation is successful, you'll receive an email confirmation. Now you're ready to go!
Access Installed Packages
Here's how to find what you just installed.
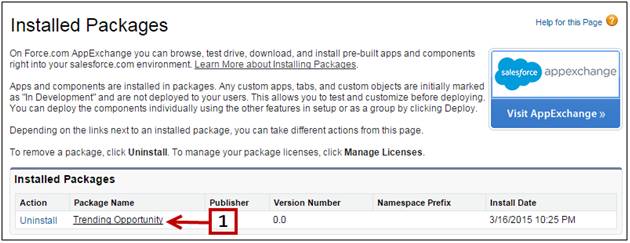
- From Setup, enter Installed Packages in the Quick Find box, then select Installed Packages.
- Click the name of your installed package. This will be the same name on the page where you downloaded the package from AppExchange [1]
- Click View Components [2].
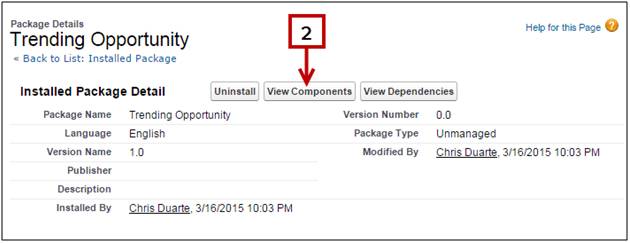
- This opens the Package Details page, where you can see all of the components, including reports, dashboards, folders, custom fields, and more. The easiest way to browse all of the reports and dashboards is to view them from the Reports tab in Salesforce.
Now you can see all of the reports and dashboards you just installed.
Modify Reports
The very first thing you need to remember when modifying an existing report is to use 'Save As'. The last thing you want to do is copy over someone else's report!
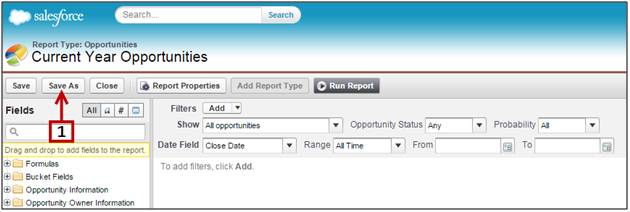
To clone your report, open a report and click the Customize button, then click the Save As button [1].
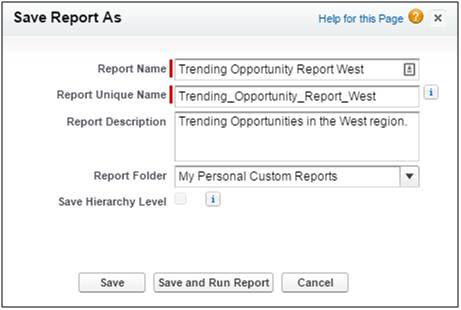
Give your report a name, description, and save it in the My Personal Custom Reports folder. You can always move it to another report folder later, but this is a safe place to experiment with reports before you're ready to have others use them.
Now you can safely customize the report.
As you're getting started with the AppExchange package, take some time to assess what reports and dashboards are in the package. Let's walk through assessing a single report. In this example, we'll be opening the Current Year Opportunities report from the Trending Opportunity AppExchange package.
- Open the Current Year Opportunities report and click the Customize button.
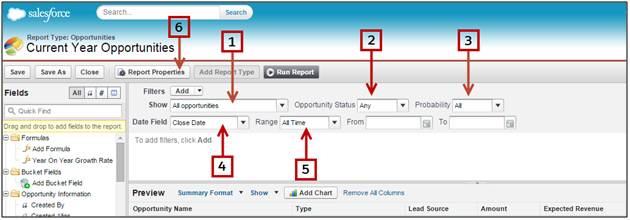
- At the top of the report, you'll see a Show filter [1] with options for My Opportunities, My Team's Opportunities, and All Opportunities.
- You'll also see filters for the Opportunity Status [2], Probability [3], Date Field [4], and Date Range [5].
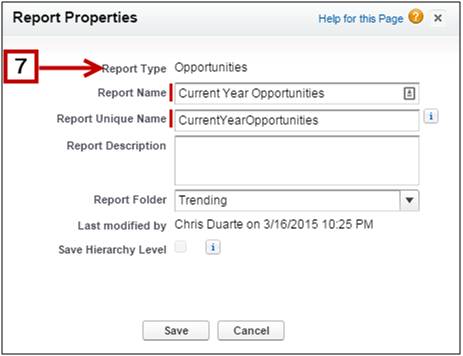
- To determine the Report Type used, click on the Report Properties [6] button.
Once the Report Properties window opens, you can view the Report Type.
Now let's look at the report columns and report format.
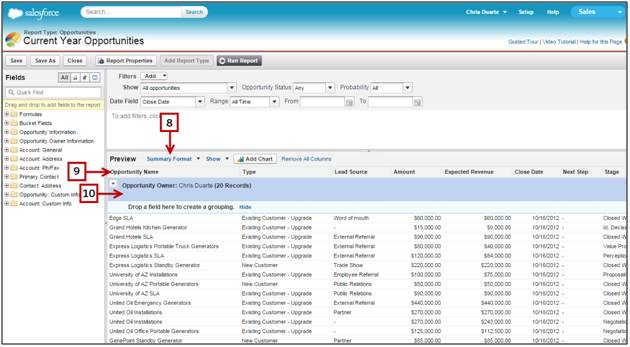
- The report format governs the way the report data is displayed and grouped. Available report formats include Tabular, Summary, Matrix, or Joined. In this example, the report format is Summary [8].
- The columns used in the report are displayed horizontally in the preview panel [9].
- If the report format is Summary, then you'll see an area where the report's rows can be grouped by a specific field [10]. In this example, we're grouping by Opportunity Owner.
As you're getting started with modifying an existing report, try doing simple things like adding and removing columns, changing the column order, and changing the date range field and criteria. You can also add new filters and change the report format as you get more comfortable. As you make changes, remember to save often and click Run Report to see your finished result, as the preview pane only displays a limited set of records.
Modify Dashboards
As with reports, make sure you use 'Save As' so that you don't copy over someone else's dashboard!
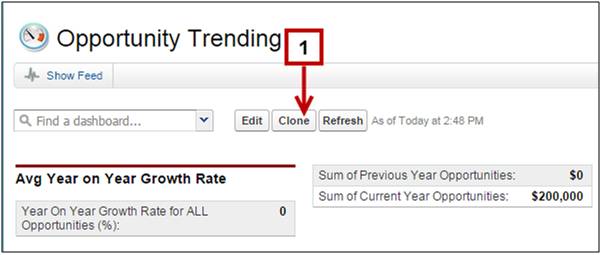
To clone the dashboard, open it up and click the Clone button [1].
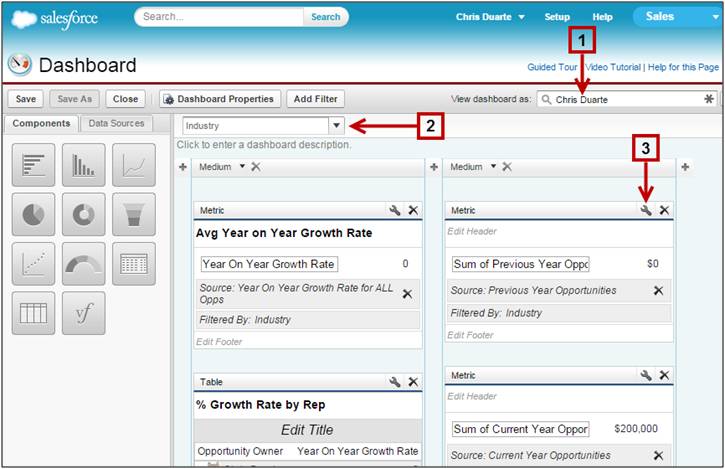
This will open up the dashboard in edit mode in the drag-and-drop dashboard builder. Now you can see how the dashboard was initially created. Let's take a closer look.
- The running user for the dashboard determines what data is displayed. The higher up the running user is on the role hierarchy, the more data that potentially will be displayed [1].
- If the dashboard has any filters, look for them right above the preview pane [2]. In this example, we've added one just so you can see where it would normally be.
- Click the wrench icon for each dashboard component [3]. This is where you can see how the dashboard component is formatted and configured, and any conditional formatting that has been applied.
As you're getting started with modifying dashboards, one of the best things to do is simply change the dashboard component type. To this end, try taking a single report and build a dashboard with that same report displayed in each dashboard component type. This will give you a good sense of how each dashboard component type works.
Common Customizations
Now that you know how to install a report and dashboard package and you have assessed what's in the package, time to start making modifications! Remember to always use 'Save As' and 'Clone' before you get started.
Here are some common ways to customize an existing report or dashboard. Try them out!
- Add a date range
- Use a relative date value like TODAY, YESTERDAY, LAST WEEK, and LAST MONTH
- Filter or group by owner
- Filter by amount threshold
- Change dashboard component type
- Change order of columns
- Add or remove columns
- Change the report format to tabular, summary, or matrix
- Add additional dashboard components
- Change to a dynamic dashboard
- Schedule the report for automated delivery
- Add report notifications
Source: https://trailhead.salesforce.com/content/learn/modules/reports_dashboards/reports_dashboards_appexchange
0 Response to "Salesforce App Exchange Install Continue is Greyed Out"
Post a Comment